From my Grandmother's Table

Sunday, 13 July 2014

Kirsch Kuchen (Cherry Cake)
I was recently in Germany for a whistlestop family visit. As is usual with my family (and I am sure, many others) no sooner had we walked in the door on the afternoon of our arrival, then we were sitting down drinking coffee and eating cake. And no sooner had we finished that, we were sitting down to a traditional, and very delicious, Bavarian meal prepared by my cousin. Sausages, cucumber salad, warm potato salad (the German kind made with hot vinaigrette, not the American version. Far too heavy on the mayonnaise for my liking), rye bread and German mustard were on the menu, all washed down with a beer. It was a very wonderful welcome.
I only tell you this as it reminded me of all the times I spent visiting my Bavarian grandparents, when every day revolved around food. First there was breakfast, then elevenses, lunch, a spot of kaffee und kuchen in the afternoon, and if we were still hungry after all of that, there was a light supper. Not surprisingly, I always came back from my German holidays a few pounds heavier.
However, although we ate cake, pudding was rare. Maybe occasionally some gelato from the Italian ice cream parlours that are on every corner during the summer, but mostly we always had fruit, and it was no different during my recent visit.
On the table was a large dish of the biggest, plumpest, reddest and juiciest cherries I have seen in a long while. This got me very excited as I absolutely love cherries. They are by far my favourite summer fruit, and I can happily chew (and spit) my way through a punnet or two with ease.


Seeing these cherries reminded me of a recipe for Cherry Cake that I had seen in my grandmother's handwritten cookery book. She was a fantastic cook, and at some point in the early sixties she wrote her own personal recipe book. All categories were covered, from cakes, puddings, and Christmas baking, to savoury starters, main courses and drinks, all written in her beautiful handwriting.
My mother now has the book in her possession but I have borrowed it for inspiration. It is funny, but in all the years I have been baking, I don't think I have ever baked anything German, other than the goodies I bake at Christmas. Perhaps it is because my mother always made her mother's recipes, and so I never felt the need to.


However, I don't think she ever made this one, and as we are in cherry season, it was the perfect time to give this cake a try. I have made a couple of changes to the recipe and added a few more details that were missing from the original version. My grandmother wrote a wonderful book, but reading it, well, you can tell that she wrote it for herself, as on occasion the methods are a little vague. For example: make the batter, put in a cake tin, bake for an hour.
Yes, that is all very well, Granny, but HOW do you make the batter? WHAT size should the tin be?, and at WHAT temperature?! You see, vague.
This is a super cake, very light, and not at all dry. There is a background note of lemon, but this could easily be replaced with almond extract if you wish since almonds and cherries are perfect partners. I was tempted to do this, but as this is my grandmother's recipe, it is only right that to do it justice I should follow the recipe as written. What did surprise me about this cake is that in my opinion, it has a 'German' flavour. I wish I could explain what that means, but I don't think I can. Perhaps it is just knowing the cake's history that it makes sense that it should taste of her homeland.  


For the Cake
200g unsalted butter, softened and at room temperature
200g icing sugar, sifted
200g self raising flour
4 large eggs
zest of 1 lemon (or 1 tsp of almond extract)
450g cherries, stoned and kept whole if possible (see the notes below)
Icing sugar for dusting

You will also need a 22cm (8 1/2") springform tin, greased and base lined with baking parchment

1. Preheat the oven to 160C / 150C fan / 325F / Gas 3-4.
2. Beat the butter and icing sugar together until very fluffy and pale in colour, about 4-5 minutes.
3. Beat in the eggs one at a time with a tablespoon of the sifted flour to prevent curdling.
4. Beat in the lemon zest and then fold in the flour gently. Don't over beat as you want to keep in as much air as possible. Once all of the flour is incorporated, stop mixing.
5. Put half of the mixture in the prepared tin, and then lay the cherries in one layer over it. They will sink to the bottom but don't worry about this.
6. Cover the cherries with the remaining mixture and level the surface. 
7. Bake for 50 minutes to an hour. My grandmother says to bake for an hour, but mine was ready in 50 minutes. Therefore you could open the oven door after 50 minutes if you wish, to check if it is done, and if not, then every 5 minutes or so until a skewer or cocktail stick comes out clean.
8. Take the cake out of the oven and leave it in the tin for 15 minutes. Remove from the tin and put onto a cooling rack. I would add to be careful with the cake as it is quite delicate while warm.
9. When the cake is cold, drench in sifted icing sugar and devour. I recommend with some whipped cream!


Baking Notes
Stoning cherries is very laborious and very dull, and unless you have time on your hands I would strongly suggest that you use a cherry stoner. I cannot say that it makes the job any more interesting, but it certainly makes light work of it, and keeps the fruit whole, which adds to the look of the cake when cut. Feel free to use tinned cherries (in juice, not syrup), or those in a glass jar, but do make sure that they are very well drained before you use them, and any excess liquid removed with kitchen paper. 


Eng-er-land, Eng-er-land!

Thursday, 12 June 2014


Vanilla Cupcakes
It can't have escaped anybody's notice that the 12th June 2014 saw the start of the month long '22 men kicking a football around on a green pitch' marathon, otherwise known as the World Cup. To be honest, I have very little interest in 'the beautiful game', but when it comes to this tournament, I can get as excited as the next person. Maybe it is because it comes around only every four years and therefore makes it something special, or maybe it is because I just enjoy all of the razzmatazz that goes along with it. I suspect it is the latter.
It is the only time in which I will actively sit and watch a football match, even though I couldn't tell you the finer points of the game, and please don't ask me about the offside rule! Not every match however, only those in which my two teams of England and Germany are playing. Of course I would like both to do well, but I think I can safely say that one team will get much further than the other, and won't go out on penalties. However, should both teams play one another, then I become like Switzerland. In other words: neutral. It is the only way not to upset either parent.
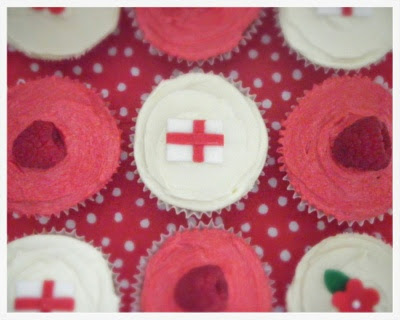
As I think you all may have realised by now, I do like a theme, and something, anything, makes me want to celebrate it with something sweet. Therefore, why not mark the occasion of the World Cup with a cake? Or more specifically, represent your favourite team's colours in edible form? I chose the English flag over the red yellow and black of the German because the colours are prettier and, if I am honest, I prefer it.
I chose cupcakes simply because I thought I could have a bit of fun decorating them. Mini fondant flags, red flowers (not quite the red rose of England, but you get the idea), and red and white buttercream sitting atop a vanilla cupcake is my interpretation.


To be honest, I don't make cupcakes very often, but there is definitely a place in mine, and your baking repertoire for a good, simple vanilla cupcake and buttercream, which you can make to celebrate any occasion. These are my favourite recipes out of all of those I have tried over the years, and are actually fairly recent discoveries. Why? Because the cakes are light, moist, and delicious with vanilla, and the buttercream, although sweet, is not so sweet that you have to leave it uneaten on the plate. 
I think I first became aware of the cupcake during an episode of the New York set, US 
comedy show 'Sex and the City' when two of the characters, Carrie and Miranda, were munching on one outside of the now famous Magnolia Bakery. This was like the dainty British Fairy Cake on acid. It was huge. Triple the size of said Fairy Cake with buttercream so high that it had to be eaten sideways if you didn't want your nose in it. This episode was at least 10 years ago, and with like so many things Stateside, the cupcake landed on our shores and never left.
My feeling is that often they promise much more then they actually deliver. I have bought many a cupcake (and from well known bakeries) in the name of (ahem) 'research', but often I am disappointed. The cake is either too dry, or tastes of.....not much, and the amount of buttercream is too much, and so sweet that it is rendered inedible. But, they always look so beautiful, and the flavours so enticing that it is hard to resist that little piece of indulgence. And I know that I will always keep on 'researching' in the hope that one day, the taste will match the look.
My preferred cupcake option is therefore more cake with enough icing to set off the decoration. I would say that my piping skills (in the words of many a school report) are satisfactory, at best, so I take the alternative option of using a small palette knife with which to spread on the buttercream. My cupcakes will therefore never look like those in the bakeries, but there is nothing wrong with that homely artisanal look. Indeed, they can look just as inviting as those professionally finished.


For the Cake

This recipe will make 24 cakes

250g self raising flour
250g golden caster sugar (or use regular white caster sugar)
1/2 tsp bicarbonate of soda
250g unsalted butter, softened
4 large free-range eggs, at room temperature
1/2 tsp vanilla extract
3 tbsp whole milk, at room temperature
Preheat the oven to 170C (fan) / 375F / Gas 5
Line a 12 hole muffin tin with your choice of cupcake cases

1. In a large bowl sift together the dry ingredients, and then add in the butter and eggs.
2. Mix together until well combined, but don't over mix, and then add in the milk and vanilla extract and  beat again until all mixed in.
3. Fill the paper cases about 2/3 full with the cake mixture and bake for 20 minutes until they spring back when touched. I also insert a cocktail stick and if it comes out clean then it is cooked.
4. Leave to cool in the tin for 5-10 minutes and then put on a wire rack to get completely cold before decorating.


For the Vanilla Buttercream
300g unsalted butter, at room temperature
1/4 tsp vanilla extract
4 tbsp whole milk, at room temperature
675g icing sugar, sifted

1. Put the butter into a large bowl and using an electric mixer beat for 5 minutes until it becomes very soft, pale and fluffy.
2. Add the icing sugar in 3 batches, beating well after each addition, and then mix in the milk and vanilla extract.
3. Beat for a further 5 minutes until the icing is very smooth, and again, very pale (almost white), and fluffy.
4. Decorate the cakes with the icing either using a piping bag and nozzle or a small knife.


.

Baking Notes
Having made these two recipes a few times now, I would say that for best results, the butter needs to be very soft in both cases for two reasons:
1. The cake is made by the all in one method and soft butter will enable you to mix it in super easily.
2. The softness of the butter is crucial to a smooth buttercream. You may think that to beat the icing for what seems like an eternity is unnecessary once all the icing sugar is mixed in, but please don't omit this stage as it is the only way to ensure a light, airy and fluffy (almost whipped in texture) buttercream, which is just as lovely to use as it is to eat. 
If you try these cupcakes, I would love to know what you think of them, and how you decorated them.

A Taste of Eastern Promise

Sunday, 1 June 2014

Pistachio and Rosewater Cake
(adapted from RedOnline here)

I cannot tell you how excited I am to share this Middle Eastern inspired cake with you. I think it is one of the prettiest cakes that I have seen for a while and it is my way of heralding the start of Summer.
When I found it amongst my recipe file, I just thought, 'oh hello.....you look tasty, come into my kitchen!'
I love all things pistachio (its ice cream is my favourite), and I love the rose flavour of Turkish Delight. Throw in some pink from the rose petals, and combined in a cake, it just had my name written all over it. However, I have never baked with this classic combination before so I was intrigued to find out if it would live up to my expectations.
It did, and I was so pleased. While the cake was baking, the most delicious scent of rose and lemon filled my kitchen, and when cut into it, that same scent was intoxicating.
The rose flavour was very delicate, (not at all like ingesting a mouthful of  perfume) and mixed with the sharpness of lemon, the cake was so moreish. The pistachio nuts give a slight green hue to the cake, and a creamy nuttiness. You will find this cake very moist because of the oils in the ground almonds, and its taste and texture improves with age. Therefore, if you make this cake, I would recommend that you do so a day or two in advance for maximum impact! 


 For the cake
225g butter, softened (and a bit extra with which to grease the tin)
60g corn flour (I was a bit sceptical about this, but its addition gives a lovely crumbly lightness) 
1 tsp baking powder
100g blanched almonds
125g unsalted shelled pistachios
225g caster sugar (I used white instead of my usual golden because that is what I had in the cupboard)
3 large eggs
Juice and zest of 1 lemon
2 tbsp rose water

To decorate
Icing sugar
25 - 50g chopped pistachios 
2 tbsp edible dried rose petals (I found mine in Waitrose, but they are available online)

To serve
Greek yogurt mixed with lemon curd

23cm 9" springform cake tin, greased with butter and base lined with a circle of baking
parchment

1. Preheat the oven to 160C/325F/Gas mark 3
2. In a dry frying pan toast the almonds and pistachios in a until they have gained a little colour and the and you can begin to smell them. Do be careful to keep an eye on them and stir them occasionally as the almonds can easily get too brown and burn. Don't be tempted to miss out this step as the toasting really helps with developing the nutty flavour.
3. Put into a food processor and grind very finely.
4. Mix the butter and sugar in a bowl until very light and fluffy, about 4-5 minutes. Add the eggs one at a time, mixing well after each one, and then add the lemon juice, zest and rosewater.
5. Sift together the flour and baking powder. Add to the butter, sugar and egg mixture and fold in gently until well combined. 
6. The mixture should be a soft dropping consistency. If not, add a little more lemon juice until it is.
7. Pour into the cake tin and bake for 40 - 50 minutes until a skewer comes out clean and the top is golden brown. If you think that the top of the cake is becoming too brown while baking, just put a layer of greaseproof paper over it. 
8. Take the tin out of the oven and leave to cool down for about 10 to 20 minutes for before removing from the tin and placing on a cooling rack. Do be careful at this stage though, because the cake is quite delicate and liable to break in half if you pick it up on either side. I would recommend a fish slice to slide under the bottom of the cake to help move it.
9. Dust with icing sugar, sprinkle either delicately, or liberally with the chopped pistachios and dried rose petals.


 If you try this cake I would really like to know how you like it. Or, do you have a recipe that you make that says 'Summer' to you?

A Show about Cake

Saturday, 31 May 2014

In April I took myself off to the Cake International show at the London Excel Centre (only to be met by not just fellow enthusiastic bakers, but also by a few thousand marathon runners, registering for the 26.2 mile challenge of endurance. It was the day before, after all).
It was the first time I have been to such a show, and I must say, I had a thoroughly wonderful time. Being in a place which is dedicated to baking and decorating, with a whole myriad of goodies to see and buy, is my idea of heaven. It is my equivalent of a child being in a sweetie shop. These kind of shows serve as inspiration because the products on offer can open up a whole world of ideas to try. I made a few purchases, but honestly, I could have gone home laden down with bags full of treasures!
However, I showed remarkable constraint, and took home with me what I knew would be most useful now, and in the near future.
Unbeknownst to me, there was also an exhibition of decorated cakes made for competition, which was a lovely surprise. Oh my, there is so much talent and creativity in this country. I was in absolute awe at some (well, actually all) of the cakes on show, and below are my personal favourites that I wanted to share with you.


  An idea for next Easter
Beautiful Wedding cakes.....
.....and wedding favours


Two of my favourite stalls


And what came home with me.....

I hope you have enjoyed my little resume of my day out, and I am already looking forward to the next show. 


Salted Caramel Flapjacks

Sunday, 11 May 2014

This weekend was all about a quick bake that would be easy to transport, as the result is going overseas this week as a gift for my German family. 
If I bake for this side of my family, I always want to make something that is not found in German baking, and is therefore unusual to their tastes. What is familiar for us in the UK then becomes something special for them.
I decided upon flapjacks because I've not made them for a while, and they would fulfil my brief. This is not my usual recipe, but one I rediscovered while spending a happy hour recently leafing through my huge file of recipes torn out of magazines over the years. This particular one is from a Sunday magazine from 3 years ago.
I was drawn to this recipe really by the presence of two words: salt, and caramel. I don't know anyone who can resist this combination of flavours. I know I can't. They would be more special than the usual plain variant, and therefore, a bit of a treat.
I cut these flapjacks smaller than I would usually because they are very rich, quite sweet (though not too salty, despite the name) and a little sticky. Cut them larger and you might find that there can be too much of a good thing!
Give these a try, and let me know what you think.


240g salted butter, diced
180g light muscovado sugar
225g tinned caramel, or dulce de leche
Small pinch of salt
350g rolled oats
50g dark chocolate, broken into pieces

You will also need a 23 cm square tin, greased and base lined with baking paper

1. Preheat the oven to 180C/Gas 4.
2. Put the butter, sugar, caramel and the pinch of salt in a saucepan over a low heat and stir occasionally until the butter has melted and the sugar dissolved.
3. Take the pan off the heat, add the oats and mix together.
4. Tip the mixture into the prepared tin and level the surface using the back of a metal spoon.
5. Bake for 20 minutes until lightly browned, take out of the oven and leave to cool in the tin. Loosen the sides of the flapjack with a palette knife (or an ordinary knife if you don't have one) while it is still warm so that it doesn't stick to the sides when you turn it out.
6. When it is cold and firm, remove from the tin.
7. To decorate, melt the chocolate in a bowl set over a saucepan with a little simmering water.
8. Drizzle over the top of the flapjack with a teaspoon in a random fashion, or, (for aesthetic
purposes), pipe diagonal lines in a criss-cross pattern, as I did.
9. Leave the chocolate to set for a few hours before cutting into approximately 25 squares.


My my, at Waterloo Napoleon did surrender.......

Saturday, 3 May 2014

Next weekend sees the yearly extravaganza that is the Eurovision Song Contest. Love it or hate, you can't escape it. Personally, I love it. It is my absolute guilty pleasure and every year nothing will stop me from settling down in front of the television and giving up 3 hours of my life to revel in both its weird and wonderfulness. I even find all the cheeky block voting that goes on (regardless of how rubbish the song), and hardly anyone voting for the UK entry anymore, quite amusing.
You might well be wondering what place Eurovision has on a baking blog. Well, I will tell you. Eventually. 
It is 40 years since the Swedish group Abba won the competition with 'Waterloo'. On the the 6th April 1974, in Brighton, to be exact.
I can't believe that it was that long ago that, in shiny flares and platforms, they entered our consciousness. I was only small at the time and I suspect my knowledge of Eurovision was non-existent. However, a couple of years later, while living abroad, the power of the BBC World Service was such that I soon became aware of this Supergroup, and I have been a fan ever since. Can I add though, that in my opinion, Mamma Mia (the film version, that is) was shocking, and I wish I'd known that all of the best bits were in the trailer before I got excited and paid good money to see it.  
To celebrate this anniversary, I wanted to revisit 'The Nordic Bakery' book, (by Miisa Mink) and whip up a cake that caught my eye. Here is the classic Swedish cake, 'Tosca Cake', or, in Swedish, 'Tosca Kaka'. I actually hadn't heard of it before but when I saw it in the book I knew that one day I would bake it. It is a whisked vanilla sponge with a caramel and almond topping and is absolutely my kind of cake. Simple, not showy, but with a little added interest. A lot like my favourite clothes, in fact.
This cake definitely goes under the header of 'new favourite', and one to be made again and again. Light, moist, buttery, with a hint of vanilla. The nutty caramel topping adds crunch, and is very, very moreish.
I cut myself a slice while it was still slightly warm, and poured over some cream (only because I had some leftover, and I hate waste you understand!). It was so good. If you were to add some berries, and Scandinavians do love a berry or two, it would make a delicious pudding. 
Or, just have it cold. Either way you won't be disappointed.


For the cake
4 medium eggs
170g caster sugar (I used my preferred golden caster sugar)
200ml double cream
100g unsalted butter, melted and cooled
2 tsp vanilla extract
2 tsp baking powder
260g plain flour 

Tosca topping
75g unsalted butter
75 g caster sugar (again, I used golden)
50ml double cream
3 tbsp plain flour 
75g flaked almonds, toasted

29cm/11inch springform cake tin greased, and  base lined (I used a 25cm/10inch tin because that is what I have)

Serves 6 - 8

Preheat oven to 200C/400F/Gas 6

1. Put the eggs and sugar into a large mixing bowl and whisk with a handheld electric whisk until the mixture is very thick, pale, doubled in size, and there is a trail in the mixture when you lift the beaters out of the bowl. This should take about 10 - 15 minutes. Do not rush this part, however bored you may become. It is imperative that the mixture is whisked for this long because it is the air that gives the cake its lightness.
2. Add the cream, melted butter and vanilla extract and fold in gently using a metal spoon.
3. In a separate bowl, sift the flour and baking powder together then fold into the egg mixture with a metal spoon again. Do this gently so that you don't knock out the air that you took so long to whisk in.
4. Pour into the prepared tin and bake in the pre-heated oven in middle of the oven for 30 - 35 minutes.
5. While the cake is cooking make the Tosca topping. Put all the ingredients in a saucepan and bring to the boil over a low heat, stirring all the time.
6. Remove the baked cake from the oven, spread the Tosca topping evenly over the top and 
return it to the hot oven for a further 10 - 15 minutes or until the topping is golden and slightly caramelised.
7. Leave the cake in the tin for about 10 minutes before turning out and leaving to cool completely.


Flowers and Bugs

Monday, 28 April 2014

So, this is what I was doing last Saturday afternoon. Making marzipan decorations to sit atop  cupcakes I had made that morning, ready for the family Easter Sunday afternoon tea. 
I can't say that I have often had much call to make decorations, but this time I was inspired by three things:

1. I had met Frances Quinn, the winner of the Great British Bake Off 2013, at an in-store appearance, where she made her signature marzipan bees.
2. I had recently attended a cake show (post to follow) and bought various bits and bobs that I was desperate to use, and,
3. It was Easter, and honestly, anything goes when it comes to baking. The more fun and colourful, the better.


Flowers and bugs. That was the theme. With a cup of tea, and Radio 2 for company I began. Colouring, shaping, rolling, sticking, stamping, painting, that was me for a good few hours. There is something quite therapeutic in repetition, particularly when you can see what that repetition achieves in front of your eyes. And I love to have something that I can completely immerse myself in and shut out the outside world.

If you would like to try something similar, this is what I used: 
  • White marzipan (any brand from a good supermarket is perfect)
  • Wilton gel colours (I bought mine in store from Lakeland, but they are also available online, here)
  • White pearl sugar balls (mine were from Sainsburys, but you should be available to find them in any good supermarket)
  • Small flower cutters (buy online, here)
  • Edible glue (however, a little bit of icing sugar and water mixed together works just as well)
  • Edible glitter (again, available from Lakeland, here)
  • Flaked almonds
  • Copious quantities of vinyl gloves to prevent your hands from staining when colouring the marzipan. Believe me, you will need them.
  • Fine paint brushes, and finally,
  • My imagination! 

I have not included any recipes in this post as the search is on for the perfect cupcake recipe that I am happy to share with you all. Nothing fancy, just a good vanilla and chocolate cupcake, along with a good vanilla and chocolate buttercream (plus, cupcakes are a whole other topic!). When that day comes, I will let you know, but in the meantime here are a couple of pictures of the finished result.